 USA
USA
 CANADA
We get it, nothing transforms a space quite like wallpaper. Whether it is sleek and modern one minute, floral of the Victorian kind the very next, or the next thing, textured and artistic wallpaper has a voice of its own. And then there is one important step that misses the masses before they make the big splash of decorating glory, and once bypassed it might just lay the seeds of a renovation nightmare.
If you are thinking of wallpapering on bare drywall without priming first, allow us to stop you right there.
A Cautionary Tale: When Wallpapering Goes Wrong
A homeowner recently wrote in with a common and frustrating issue:
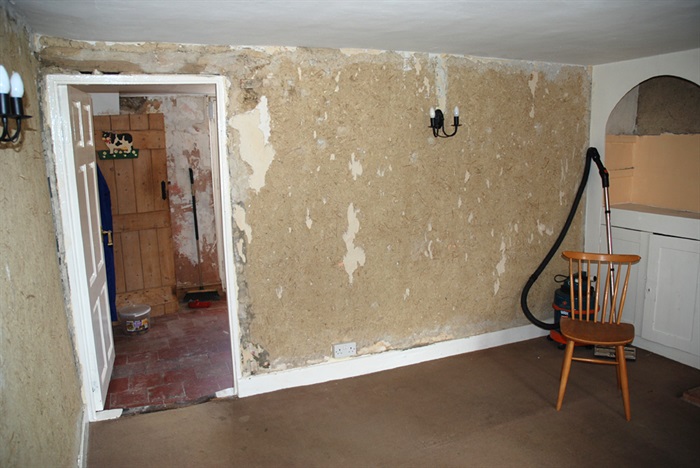
“My entire kitchen had wallpaper. I was unsure how to take it down so I had a friend help. However, lots of drywall peeled off with the wallpaper. Can you tell me what to do?”
Sound familiar? If you have ever wallpapered and ended up with parts of your wall coming off along with it, you have committed the very mistake that thousands of other people have: they never primed the drywall before applying wallpaper.
Let us discuss why this is an issue and how to go about rectifying the problem if it has already been created.
Why Primer Is a Must Before Wallpapering
In the professional wallpaper hanging process, sealing drywall with a good-quality primer comes as one of the very early steps. And why is this done? The reason is that drywall in its bare state is porous. Thus, if the surface remains unsealed, the paste that hangs the wallpaper will absorb directly into the drywall.
Here’s what happens when you do prime your drywall:
- Easier application: Glue is slightly wet on a primed wall, allowing you to slide the paper into perfect alignment.
Cleaner removal: Wallpaper pulls away clearly, without hurting the paint underneath, when it is time to change décor.
Now here’s what happens when you don’t prime:
- The wallpaper adheres directly to the paper face of the drywall.
- When you try to remove it, large chunks of drywall come off with it.
- You’re left with deep gouges and torn, fuzzy brown paper on the wall.
All this damage makes the wall nearly impossible to work with for repainting or re-wallpapering, at least without serious prep work.
What To Do If Your Drywall Is Already Damaged
If you’re reading this after the damage is done, don’t worry—it’s fixable. But it will take a few extra steps.
Step 1: Seal the Wall
The first thing you will want to do is to apply a primer-sealer. This seals in the torn paper and damaged drywall, thus preventing moisture from bubbling or peeling the remaining surface.
In the classic days, pigmented shellac or oil-based primers were selected for the repair. These products penetrate deeply into the surface and literally seal it in place; however, their downside is that they are fume-giving agents. In reality, the fumes are quite unpleasant if you are working in a closed situation like a kitchen or a bathroom.
Thankfully, those days are past; we now have great water-based and low-odor alternatives.
Gardz by Zinsser is another very good specialty drywall sealer. Gardz contains acrylic resins that will soak into the wall, harden it, and give you a smooth finish that is ready for paint. When completely dry, you can drywall mud over gouges, sand smooth, and confidently repaint or wallpaper.
Step 2: Patch and Smooth
Once the seal is done, go over the damaged areas with a coat of high-grade joint compound or drywall mud. This will ensure that the surface will be leveled out as it fills in any gouges and rough patches created in the wallpaper removal process.
Allow the mud to dry completely, and then sand lightly until the wall is smooth. Depending on how extensive the damage is, a second coat of mud may be necessary for the best finish.
The final step is to recoat the smooth wall with a general-purpose primer before painting or wallpapering again.
Avoid This Mess Next Time
The real lesson here? Don’t skip the primer. How do you save negative energy in the long run through just a minor process? Be it a do-it-yourself task or having the professionals take a stab at it, this should not be neglected.
Priming drywall:
- Helps wallpaper adhere properly (but not permanently)
- Prevents damage when removing wallpaper
- Seals porous surfaces to avoid bubbling and peeling
- Saves you time, money, and effort when redecorating
The Bottom Line
Shortcuts might save a few minutes during installation, but they almost always cost more in the long run. If you’ve ever had to scrape off stubborn wallpaper while your drywall crumbles beneath it, you already know: the price we pay later isn’t worth the shortcut now.
So, whether you’re tackling a full room makeover or adding just a feature wall, do your future self a favor, seal that drywall first. Your walls will thank you when it’s time for a change.
See Also: