 USA
USA
 CANADA
Peel-and-stick wallpaper has become the solution for interior designers, as well as for the DIY type of audience. It's fancy, cheap, and at least in theory, trash-free installation. The bottom line is that peel-and-stick wallpaper could very well be the easiest wallpaper to put up it requires proper wall preparation to look good and last long. Without such preparation, it is like putting a house on sand: it just won't hold.
If you're going to install peel-and-stick wallpaper, don't rush into the fun part. The flawless finish came first with a strong foundation, and that foundation requires investing effort into getting your walls ready. In this blog, we'll go over everything that is needed to prepare walls for easy application and for the wallpaper to remain on them.
Step 1: Clean, Clean, Clean
Rule one for wall preparation is cleanliness. All wall surfaces must be clean and free of any dust, dirt, grease, or residue. Even the smallest amount of dirt prevents the adhesive of your wallpaper from binding properly.
So, begin by wiping the walls with a damp cloth or sponge. Use a mild household cleaner for locations with heavy buildup. Once the surface dries, clean again with plain water to rinse off any residue from the cleaning agents. Dry thoroughly afterwards. Do not trap moisture under the wallpaper; it can create bubbles, lead to peeling, and in time might also form mold.
Step 2: Assess the Texture
Many contemporary homes come with surface texturing for their walls. While this can sometimes appear very stylish, textures do not go well with peel-and-stick wallpapers. The wallpaper can never stick well to a wall with heavy or pronounced textures. It will cling onto just the raised portions of the wall, trapping air pockets, which are the reasons for wrinkling and peeling.
Light or less noticeable textures can also pose problems with application, so it should be given attention. Run your hand across the wall surface; if it feels bumpy, it should be dealt with before carrying on.
Step 3: Smooth It Out
So, what happens with a textured wall? Well, you'd better just get rid of it. It is dirty work, but without doing so, there is no way the wallpaper will hold down.
You might want to smooth down the wall by sanding. Using a sanding block with a sanding screen is all you need to do the job. It will require some elbow grease, but the smoother the wall, the better the wallpaper will behave. Mask and eyewear should be put on throughout sanding because there will be tons of dust.
Once sanding is done, vacuum and wipe the wall all over again to remove any dust. Never, never skip this second cleaning step- it's crucial.
Step 4: Seal the Deal with Pigmented Shellac
After walls have been washed and sanded, it is time for priming. So many folks go with the latex types or just another product for walls, but they can choose better.
White pigmented shellac is not just another primer- there are very few products more suited to wallpaper because they absorb into the wall rather than sitting on top of it as a latex coating would. This means adhesives for peel-and-stick wallpaper will better adhere to the surface, thus reducing the risk of any peeling or slipping.
Treat your wall with two coats of pigmented shellac. Either brush or roller application can be used. The good thing: it dries fast. Each coat requires only about 30 minutes of drying time, so your wall will be ready to have wallpaper applied in just over an hour. In stark contrast to many others that insist on a cure time of a whole night, pigmented shellac lets you work in a blink, all the while maintaining top quality.
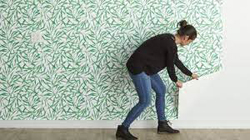
Step 5: Time to Install
With your wall free of dust, smooth, and primed, it is now time to apply peel-and-stick wallpaper. Follow the manufacturer's instructions to a T, particularly when it comes to lining up and smoothing out the bubbles; after all, you have done so much work prepping your surface.
Wall prep, admittedly, is an extra headache and an impediment for the peel-and-stick wallpaper lover, considered convenient enough. However, wallpaper will not stick properly on a surface lacking proper preparation. Properly done upfront, the wallpaper will be easier to install, last longer, and just look better.
Final Thoughts: Do It Right or Do It Twice
"If the work is worth being done, it is worth being done properly." The allusion really holds here for wallpapering, especially with peel-and-stick.
Preparation of the walls is truly the foundation of the whole design. When done properly, it allows the end product to shine without defects like bubbles, seams, or corners lifting. And do not rush the preparation. Plus, if you invest in proper preparation, you will end up with walls that definitely wow.
Can I help you format this more for your website using subheadings and bullet points?